This comprehensive Linux guide expects that you run the following commands as root user but if you decide to run the commands as a different user then ensure that the user has
sudoaccess and that you precede each of the privileged commands withsudo
Zabbix is open-source software monitoring tool. It collects data from different devices over the network and ensures that they are up and working. It can also be configured to send alerts if it detects an anomaly
It can run on many platforms. Here we would discuss the installation and configuration of Zabbix on Centos 7 System
Installing Dependencies
Zabbix can be configured on MySQL as well as MariaDB as the database backend. In this tutorial we would be installing and configuring MariaDB as a database back-end. If it is not installed already follow to next steps to install MariaDB on your CentOS System
Installing MariaDB
Install MariaDB on the server using the following commands
yum -y install mariadb-serverAfter installation is complete run the following commands to start the MariaDB service and add it to startup
systemctl start mariadb
systemctl enable mariadb
To verify that MariaDB is installed and running use:
systemctl status mariadbCreating MySQL Database
To start installation you need a MySQL database. Login to MySQL to create a new databse using
mysqlWithin the MySQL shell, run the following command to create a new database named zabbix
CREATE DATABASE zabbix CHARACTER SET utf8 collate utf8_bin;Next, create a MySQL database and grant access to the database
GRANT ALL ON zabbix.* TO 'zabbix'@'localhost' IDENTIFIED BY 'any_password';Make sure that you change the ‘any_password’ to any password of your choice which must have a capital letter, small letter, a number and a special character.
When you are done setting up, type EXIT to close the MySQL console
Installing Zabbix
To download Zabbix from official repository, use
wget https://repo.zabbix.com/zabbix/4.0/rhel/7/x86_64/zabbix-release-4.0-1.el7.noarch.rpmAfter the completion of download, install the downloaded package using:
yum localinstall zabbix-release-4.0-1.el7.noarch.rpmInstall the remaining dependencies such as Zabbix server, the web frontend with MySQL database support and the Zabbix agent packages using
sudo yum install zabbix-server-mysql zabbix-web-mysql zabbix-agentInstalling Apache2/httpd
You can install Apache by using yum command as below
sudo yum -y install httpdRun the service and add it to system boot using:
systemctl start httpd
systemctl enable httpd
To check if it is installed or not using the following netstat command
netstat -plntuInstalling And Configuring PHP
Before installing run the following commands
yum -y install epel-release
sudo rpm -Uvh https://mirror.webtatic.com/yum/el7/webtatic-release.rpm
Now install packages using yum command
yum -y install mod_php72w php72w-cli php72w-common php72w-devel php72w-pear php72w-gd php72w-mbstring php72w-mysql php72w-xml php72w-bcmathAfter installing you will need to configure the following file and make changes to timezone according to your location.
nano /etc/httpd/conf.d/zabbix.confChange the second last line which shows the timezone according to your location, i.e Asia/Karachi in my case.
- /etc/httpd/conf.d/zabbix.conf
-
...

        php_value max_execution_time 300
        php_value memory_limit 128M
        php_value post_max_size 16M
        php_value upload_max_filesize 2M
        php_value max_input_time 300
        php_value max_input_vars 10000
        php_value always_populate_raw_post_data -1
        php_value date.timezone Asia/Karachi

...
When you are done editing, use the following commands to restart the service and make the changes take effect.
systemctl restart httpdConfiguration Of MySQL Database
The Zabbix server creates a file which contains all the initial parameters and data for the MySQL server. Use the following command to get that file:
zcat /usr/share/doc/zabbix-server-mysql*/create.sql.gz | mysql -uzabbix -p zabbixEnter the username and password if prompted.
Open up the Zabbix configuration file on the editor using nano or vim and uncomment the DBPassword Line. Save it with your password that you have already configured.
nano /etc/zabbix/zabbix_server.conf- /etc/zabbix/zabbix_server.conf
-
...
### Option: DBPassword
#       Database password.
#       Comment this line if no password is used.
#
# Mandatory: no
# Default:
DBPassword=change-with-your-password
...
Save the file and restart the Zabbix server and also add it to the system startup using
systemctl restart zabbix-server zabbix-agent
systemctl enable zabbix-server zabbix-agent
To check the server status use:
systemctl status zabbix-server
zabbix-server.service - Zabbix Server
   Loaded: loaded (/usr/lib/systemd/system/zabbix-server.service; enabled; vendor preset: disabled)
   Active: active (running) since Sun 2020-04-10 21:18:01 UTC; 51s ago
 Main PID: 5558 (zabbix_server)
   CGroup: /system.slice/zabbix-server.service
   ...
Zabbix Frontend
Zabbix frontend is PHP based dashboard that allows us to configure host monitoring, change server configuration, and view gathered data.
To install and configure it, open up a web browser and and type your server’s domain name or public IP address followed by /zabbix:
http(s)://your_ip_address/zabbixA GUI will guide you though the process of setting up. When the setup wizard will ask you to enter your database connection details, enter the database name and password that you have used earlier to configure MySQL database. Entering a name for the server is optional. The default user is “Admin” and the password is “zabbix”. Enter the username and password and click on the Log in button.
Once Logged in you can the see the Zabbix Admin panel. Here you can start customizing your Zabbix installation and adding new hosts
Adding A New Host
Install Zabix Agent On Remote Host
Similarly as we have done with the server, use the following commands to install Zabbix on remote host
wget https://repo.zabbix.com/zabbix/4.0/rhel/7/x86_64/zabbix-release-4.0-1.el7.noarch.rpm
yum localinstall zabbix-release-4.0-1.el7.noarch.rpm
Install the Zabbix agent package using
yum install zabbix-agentZabbix supports two methods for server-client communication encryption, Preshared Key (PSK) and certificate-based encryption. In this tutorial, we will use the pre-shared keys (PSK) method to secure the connection between the server and agent.
Use to following command to generate a pre-shared key and save it to a file:
openssl rand -hex 32 | sudo tee /etc/zabbix/zabbix_agentd.pskThe Key would look like something shown below:
- /etc/zabbix/zabbix_agentd.psk
-
87lcv41vbgq5s3dc17j8k74564nb1ad35sv4c86df74bg68ry74jhn65f
Open the Zabbix agent configuration file and search for the Server IP address and change it from the default value to your Zabbix server IP:
nano /etc/zabbix/zabbix_agentd.conf- /etc/zabbix/zabbix_agentd.conf
-
...
### Option: Server
#       List of comma delimited IP addresses, optionally in CIDR notation, or DNS names of Zabbix servers and Zabbix proxies.
#       Incoming connections will be accepted only from the hosts listed here.
#       If IPv6 support is enabled then '127.0.0.1', '::127.0.0.1', '::ffff:127.0.0.1' are treated equally
#       and '::/0' will allow any IPv4 or IPv6 address.
#       '0.0.0.0/0' can be used to allow any IPv4 address.
#       Example: Server=127.0.0.1,172.168.1.100/24,::1,2001:db8::/32,zabbix.example.com
#
# Mandatory: yes, if StartAgents is not explicitly set to 0
# Default:
# Server=

Server=127.0.0.1
...
Find the TSLConnect option, uncomment it and set it to psk:
- /etc/zabbix/zabbix_agentd.conf
-
...
### Option: TLSConnect
#       How the agent should connect to server or proxy. Used for active checks.
#       Only one value can be specified:
#               unencrypted - connect without encryption
#               psk         - connect using TLS and a pre-shared key
#               cert        - connect using TLS and a certificate
#
# Mandatory: yes, if TLS certificate or PSK parameters are defined (even for 'unencrypted' connection)
# Default:
TLSConnect=psk
...
Locate the TLSAccept option, uncomment it and set it to psk:
- /etc/zabbix/zabbix_agentd.conf
-
...
### Option: TLSAccept
#       What incoming connections to accept.
#       Multiple values can be specified, separated by comma:
#               unencrypted - accept connections without encryption
#               psk         - accept connections secured with TLS and a pre-shared key
#               cert        - accept connections secured with TLS and a certificate
#
# Mandatory: yes, if TLS certificate or PSK parameters are defined (even for 'unencrypted' connection)
# Default:
TLSAccept=psk
...
Find the TLSPSKIdentity option, uncomment it and set it to PSK1. This value must be a unique string:
- /etc/zabbix/zabbix_agentd.conf
-
...
### Option: TLSPSKIdentity
#       Unique, case sensitive string used to identify the pre-shared key.
#
# Mandatory: no
# Default:
TLSPSKIdentity=PSK1
...
Finally, locate the TLSPSKFile option, uncomment it and set it to point to the previously created pre-shared key:
- /etc/zabbix/zabbix_agentd.conf
-
...
### Option: TLSPSKFile
#       Full pathname of a file containing the pre-shared key.
#
# Mandatory: no
# Default:
TLSPSKFile=/etc/zabbix/zabbix_agentd.psk
...
When done modifying, save and close the file.
Run the Zabbix Agent and add it to the startup
systemctl start zabbix-agent
systemctl enable zabbix-agent
Add a firewall rule that allows traffic through for Zabbix Server through TCP Port 10050
firewall-cmd --new-zone=zabbix --permanent
firewall-cmd --zone=special --add-source=172.168.1.100/32
firewall-cmd --zone=special --add-port=10050/tcp
Do not forget to change 172.168.1.100 according to your IP adress.
Add Host To Zabbix Server
Now we have to register the host on Zabbix Server on a machine also running Centos 7
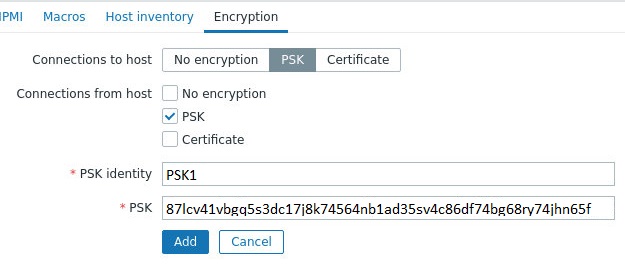
Login to the Zabix Server. Click Configuration from the top panel and select Hosts. Click the Create Host button on the top right corner of the screen and the host configuration page will open. Enter the Hostname and the IP Address of the remote host machine you want to monitor.
- Click the
Templatestab. Select theTemplate OS Linuxand click on theAddlink to add the template to the host. - Click on the
Encryptiontab. Select PSK for bothConnections to hostandConnections from host. - Set the
PSK identityvalue toPSK1, the value of theTLSPSKIdentitywhich you have set in the previous options. - For the
PSK valuefield, enter the key you previously generated i.e. the one stored in the/etc/zabbix/zabbix_agentd.pskfile.
Click on the blue Add button when finished.