In this tutorial we will be setting up a LAMP stack , which includes Apache 2, MySQL or MariDB, PHP on CentOS 6.
This comprehensive Linux guide expects that you run the following commands as root user but if you decide to run the commands as a different user then ensure that the user has
sudoaccess and that you precede each of the privileged commands withsudo
Prerequisite
Since we have to install MySQL or Maria DB and PHP modules, we need to set up EPEL repository. EPEL (Extra Packages for Enterprise Linux) provides us the extra packages we need to install on our CentOS 6 server.
By default, CentOS 6 does not have these packages as native, so we will enable the EPEL.
Using wget, we will download and install the EPEL RPM to enable it.
wget http://dl.fedoraproject.org/pub/epel/6/x86_64/epel-release-6-8.noarch.rpm
rpm -ivh epel-release-6-8.noarch.rpm
Once we have enabled the EPEL, we can verify it using yum.
yum repolistWe should see a list, where all the EPEL packages were shown. Now lets move forward and install our LAMP stack.
Install Apache Server
Using yum, we will be installing our Apache web server. Also, by default CentOS 7 comes with native Apache 2 package.
yum install httpd -yNow start the http service and enable it to start at boot .
service httpd start
chkconfig httpd on
CentOS 6 server comes with iptables service for network filtering. If firewall is enabled, then we need to perform the below steps in /etc/sysconfig/iptables file and save the file.
- vi etc/sysconfig/iptables
-
-A INPUT -m state --state NEW -m tcp -p tcp --dport 80 -j ACCEPT
Now, open web browser on a remote PC and type in the URL http://<Your server IP>. You should see a page similar to the following.
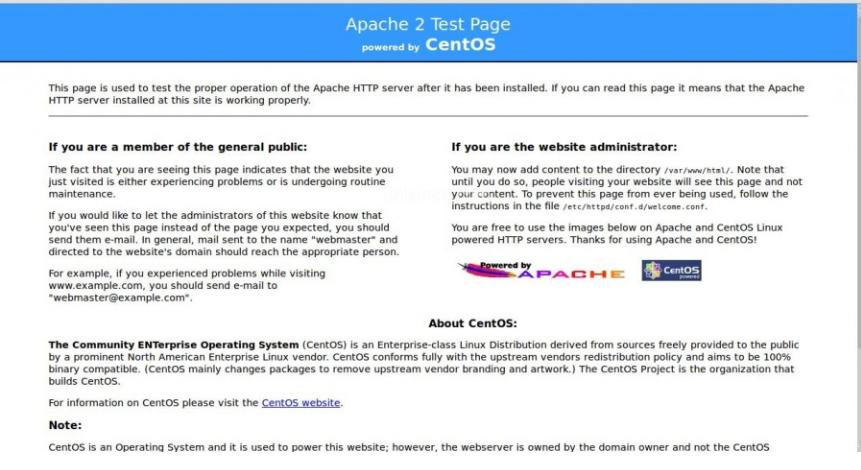
We have successfully installed our Apache web server. Lets move forward with further installation process.
Install MySQL / MariaDB
Install MariaDB
Since MariaDB is a MySQL fork of the original MySQL developer Monty Widenius, We will go with MariaDB.
yum -y install mariadb-server mariadbAfter installation we need to start and enable the DB services.
service mariadb start
chkconfig mariadb on
Now we need to configure the Database to complete the installation
mysql_secure_installationWe will be asked to enter the password for the MySQL root account, since
we haven’t set this yet, so just hit ENTER . Then we will be asked to set that password. we should type Y to set a root password.
To rest of all the questions, the script asks, you should press Y, followed by the ENTER key at each prompt. During this process we will remove anonymous users and the test database, disable remote root logins, and load these new rules MySQL.
Install MySQL
NOTE :This is an optional step, since MariaDB is already installed. If you want to go with MySQL instead of MariaDB, then this for you.
We need to download and add the MySQL community repository to proceed further.
wget https://dev.mysql.com/get/mysql80-community-release-el6-1.noarch.rpm
rpm -ivh mysql80-community-release-el6-1.noarch.rpm
yum update
Now we need to install, start and enable MySQL. During the installation, we will be asked to accept the results from the .rpm file’s GPG verification. If no error or mismatch occurs, enter y.
yum install mysql-server
service mysqld start
Further installation is similar to MariaDB..
mysql_secure_installationInstall PHP
Now to generate dynamic content, we need to install PHP. We can get a full list of available PHP modules and extensions using the following command.
yum search phpTo install PHP, we need to install the modules for a basic MariaDB support in PHP and PhpMyAdmin. we will be installing the following modules
yum install -y php php-mysql php-pdo php-gd php-mbstringwe need to create a test PHP file in our document root. We will create a codesposts.php file in the document root to test our configuration
vi /var/www/html/codesposts.php- /var/www/html/codesposts.php
-
<?php phpinfo(); ?>
After pasting the above code to our codesposts.php file, save and close the file.
Restart the httpd service and we can visit this web page in a web browser from the below shown URL.
systemctl restart httpd.service
http://<Your_serverIP>/codesposts.php
we should see a web page that has been generated by PHP with information about your server.
Install phpMyAdmin
phpMyAdmin is a web interface, used to mange our MySQL/MariaDB database.
To avoid using MySQL command line to manage our database we will install PhpMyAdmin package. Since EPEL is already enabled, we can install directly
yum install phpmyadmin -yWe need to configure phpMyAdmin to allow connections from remote hosts by editing phpmyadmin.conf file
vi /etc/httpd/conf.d/phpmyadmin.confComment out the following lines, using “#” and save the file.
- /etc/httpd/conf.d/phpmyadmin.conf
-
# Order Deny,Allow
# Deny from all
# Allow from 127.0.0.1
We will be using http authentication instead of cookie based authentication. Open /etc/phpMyAdmin/config.inc.php
vi /etc/phpMyAdmin/config.inc.phpModify the below line as follows.. and restart the apache service.
- /etc/phpMyAdmin/config.inc.php
-
[...]
$cfg['Servers'][$i]['auth_type']     = 'http';    // Authentication method (config, http or cookie based)?
[...]
systemctl restart httpd.serviceNow after the configuration, we can check our PHP configuration from the below URL
http://<Your_serverIP>/phpmyadmin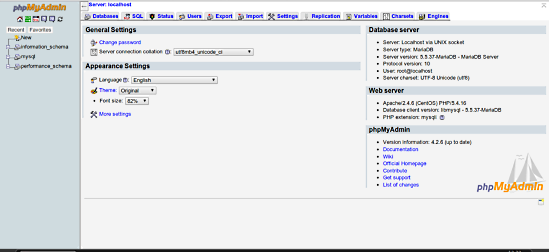
We will get an output something similar to the above. We have successfully completed the installation process of LAMP stack on CentOS 6.
Thanks for being with us, hope this help you in gaining knowledge and we are always ready to help you. For furthers queries or suggestions, kindly drop a comment below.